
Difficulty
Easy
Steps
8
Time Required

User-Contributed Guide
This guide is not managed by the site's staff.
Quiz
0
-
-
DO NOT USE THIS GUIDE if you have a DUET controlled SeeMeCNC 3D Printer.
-
Quick Start for all SeeMeCNC printers is now a link on our website menu item SUPPORT > Quick Start
-
-
-
Open MatterControl and click the "Printers..." button and then click on the Add New Printer button.
-
You'll be presented with a Setup Wizard that will allow you to enter the Make & Model of the printer you're adding. In this case, you'll chose the one that best describes your printer.
-
Note that if you're using the SeeMeCNC branded version of MatterControl, SeeMeCNC will be the only Make available.
-
If you have an H2 printer, it has not yet been added to MatterControl as an option. Choose Orion instead. You will need to change the bed size in the Printer > Print Area settings of MatterControl.
-
For the 178mm arms your bed size is: 140 x 140
-
For the 290mm arms your bed size is: 200 x 200
-
The next page of the Setup Wizard will ask to install a Communications Driver. If you installed one during the MatterControl install process, you don't need to install a driver here. For Mac & Linux users, no driver is required.
As of this date, there IS a preset option for the H2 so I used that. Seems ok so far.
Jeremy Vanseader - Resolved on Release Reply
This happened to me as well, the crashing and grinding. After playing with the control I realized I had the motors connected backwards to the Rambo. I turned it off, flipped the controls, turned it back on, and now everything is working great. I am not sure how I missed this in the build, but fixed it. The auto-calibration is great!
I had the same problem - crashing into X-tower, grinding, etc. I loosened all of the tower bolts and made sure the towers were firmly seated, and re-tightened the stepper motor belts about double what I had previously and it calibrated perfectly.
Andrew Dunne - Resolved on Release Reply
Matthew, I'm having the same problem. It goes down, acts like a jackhammer, and drags itself to the Y platform, continuing to jackhammer until I turn it off. Did you find a solution?
Jason Simpson - Resolved on Release Reply
After contacting support, I have fixed this issue by two things, first making sure all the belts were tight, and second, (which I think was the real source of the problem) was wiggling the white/black wires in the Rambo...for some reason those are really loose, and when one of the towers is loose, then it won't work at all, so make sure those three sets of wires are making a good connection!!
I have verified that all the motors, fans, heated bed, and extruder work. However, when I try to run the calibration script, the extruder head nears the platform and then presses itself hard and then drags itself along the platform. I immediately shut off the printer to prevent it from damaging itself. I have checked all the wires and pushed the motor connectors snug into the RAMBo. Anyone else have this problem?
Matthew Gentile - Resolved on Release Reply
When I first tried this on my printer it made terrible grinding sounds. I verified all of my motor connections and they were correct. Upon plugging them back in I found that they weren't very good fits into the RAMBo board and really pressed down on them to seat them well. That solved the issue. Calibration worked the next time. I'm going to look into replacing the connectors on the ends of the motors, but for now people should be aware that they have to verify these connectors are seated very, very well.
-
-
-
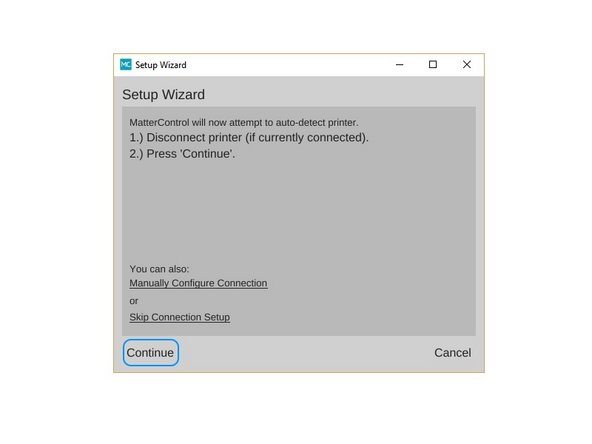
The next Setup Wizard page will instruct you to disconnect your printer to allow it to detect what port it's attached to.
-
Once the Setup Wizard has detect the port your printer is connected to, you can click the Connect button in order to complete the configuration process.
-
-
-
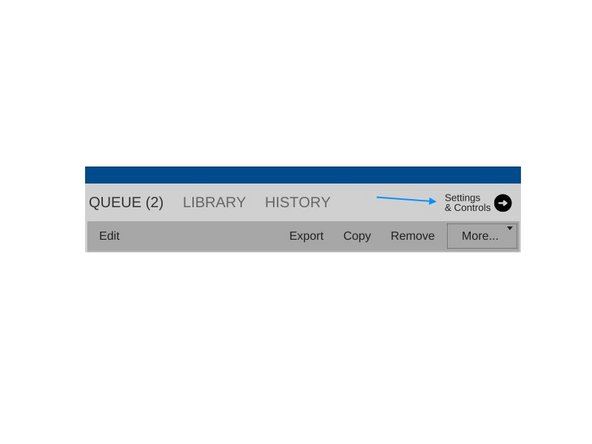
The next task is to perform the initial calibration of the printer. This is done by sending a "G29" command to the Rostock MAX v3.
-
Click on the Settings & Controls button as indicated.
-
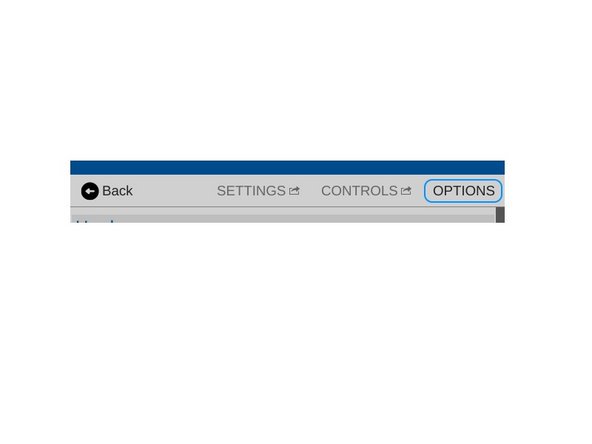
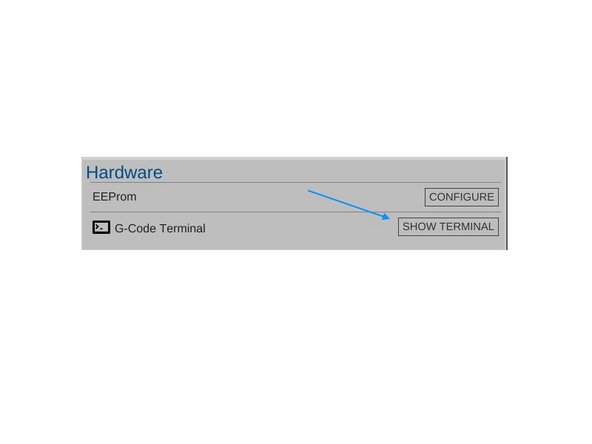
Click on the Options button and then click on the Show Terminal button. This will open up a serial terminal that you'll use to talk to your Rostock MAX v3.
-
-
-
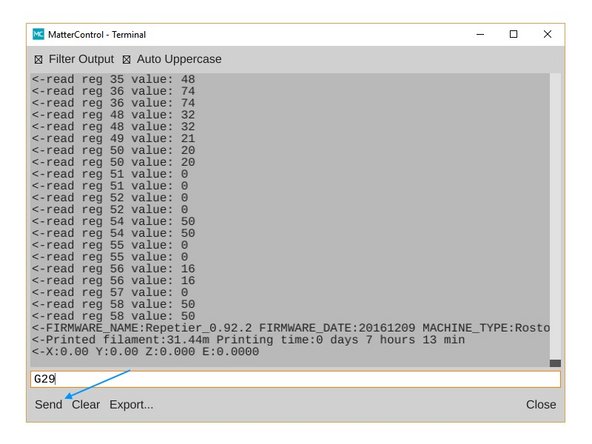
Once the Serial Terminal window is open, type G29 into the input line as indicated and press Enter, or click the Send button.
-
Sending G29 starts off the built-in calibration process that is needed to get the Rostock MAX v3 to a state where a more accurate calibration can be performed.
Does the printer arms actually move up and down while running the G29? My Matter Control Terminal is running at N725 right now but the printer has not moved at all. I am on a Rostock Max V2, hoping these instructions work for the V2 as everything seems to say V3 in the instructions on this page.
My previous comment was incorrect. A good g29 does run for a while (like 3 or 4 up and downs), but eventually does end with the message “Calibration Complete” on the display.
Steve Hansel - Resolved on Release Reply
From what i can tell, an successful G29 command runs over and over forever. This is why you need to reset things before doing anything else. If G29 stops, check the display. If it says something about an ‘OFFSET ERROR’, it probably means that the screws that hit the end stops are set to different heights. I couldn’t get them even by measuring. I found the best way to adjust them is to watch where the calibration ‘taps’ on the plate relative to the white circle. The 3 taps should be about the same distance out from the center. If it taps too far out, make the screw higher on the nearest carriage (which makes it home lower). If it taps too far in, make the screw slightly lower (which make it home higher). You’ll probably have to iterate on it a few times since adjusting one affects the others a little.
Steve Hansel - Resolved on Release Reply
-
-
-
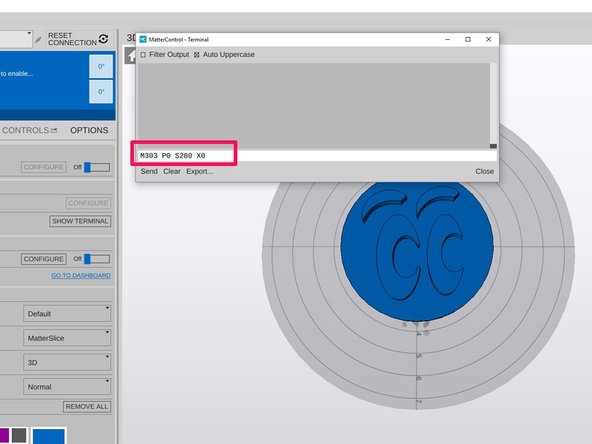
Next you need to PID Tune your hot end. This will ensure that the algorithm that controls the power to the heating element is working at optimal performance.
-
Send the following command via the terminal: M303 P0 S235 X0
-
After you have run the PID tune via MatterControl you should disconnect from MatterControl and then re-connect before performing any further operations.
-
Auto-Tuning is an iterative process, so run the routine again via the terminal, sending: M303 P0 S235 X0
-
Full explanation: M303 is the instruction to start the Autotune Process, P0 instructs it to perform the test for the hotend, S235 sets the temperature to run the test to, and X0 is the instruction to save the results to EEPROM.
-
If you plan to print high temperature materials you should run a PID Auto-Tune at a higher temperature at the target temp that you plan to be printing at.
I would like to see this step expanded. For example once the command is sent to the machine should I power off when it gets to the target temp? Should I leave it like that a while? Should I send command to store settings in EPROM after? Should I repeat the proces a couple of times? Only disconecting and reconnecting to Matter Control or should I also reset the machine? Sorry for all the questions :)
FranciscoJS12 - Resolved on Release Reply
If memory serves, the PID auto-tune routine will store the needed values in the EEPROM and turn off the heater.
geneb -
The command says S235, but then in the explanation it says S250 and in the picture it shows S280... I'm pretty sure S250 is correct, yes?
Andrew Dunne - Resolved on Release Reply
I believe that the SXXX parameter is the target temperature. If you only plan to print PLA - S235, PLA + PETG - S250, all of the above + Nylon and other high temp filaments - S280 (also this is the max temp that the HE280 supports).
I believe that: "Send the following command via the terminal: M303 S250 X0" is incorrect. The command should be M303 P0 S250 X0 . The 'P0' is missing in the step.
Mark Slayton - Resolved on Release Reply
-
-
-
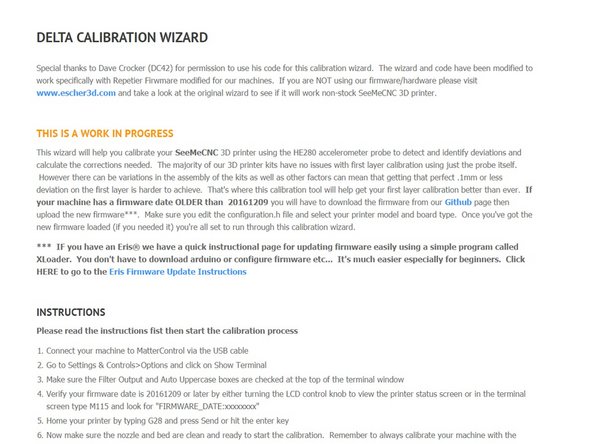
If your first layer is not as level as you wish you can run an advanced calibration. To do this, you'll need to open a web browser to SeeMeCNC's Delta Calibration Wizard. This web site will guide you through the remaining steps required to finish the calibration of your SeeMeCNC Delta 3D Printer!
-
-
-
Now that the printer is assembled and calibrated, it is time to get better acquainted with MatterControl and running your first prints.
-
Here is the Getting Started User Manual
-


Cancel: I did not complete this guide.
21 other people completed this guide.
8 Comments
ive checked my wiring several times now and everything is connected well. there seems to be an issue with my Y axis it moves to about the half way point on the tower and does not rise again during calibration it will hit the bottom of the tower and try to go farther.
Robert Walker - Resolved on Release Reply
I have done both the G29 calibration and the escher one a number of times. I am having trouble printing some test patterns such as this https://www.thingiverse.com/thing:123944... . When I try to print it the print head smacks the build plate and then rises several cm as it travels towards the z tower which it then hangs up on. Printing smaller things like rpi cases in the centre of the plate work ok with the first layer being noticeably thin at the front. I have also seen some accelerometer errors while doing the escher calibration.
Neil James - Resolved on Release Reply
Karl, what printer are you working with? When the nozzle smacks the bed like that, you shouldn’t ever just let it keep going - you could damage the belts or other components.
You may have a wiring issue with one ore more of your stepper motors - make sure that the connectors are fully seated and that the pins are fully seated in the connector shell.
geneb -
What causes the hot end assembly to crash like that? On my MAX 3 it not only crashes on the plate, but against the side rail too.
My G29 sets the auto calibration in action but each time it moves the hot end over to the X side of the bed it crashes. It pushes the end down past where it should go and makes a horrific sound like it’s trying to self destruct. It sounds like the rubber belt is stalled and the gear drive is ripping at the teeth. I gritted me teeth and let it continue and after a half dozen failed actions it said CALIBRATION FAILED on the small LED panel at the top,of the machine.
Karl Scribner - Resolved on Release Reply
Once you’ve got the firmware installed, you can navigate to the calibration menu - go to Advanced Settings -> Calibration Menu -> Full Calibration. That will perform the same task that the G29 g-code does, but it won’t do the PID tuning (which with the current firmware, really isn’t required).
Is there no way to calibrate without directly connecting to my computer? Is it possible to do any of these steps from inserting an SD card?
IQdesignlabs - Resolved on Release Reply