Introduction
This guide has been created by user Jim Carter. Many thanks to Jim and all of our users who share their knowledge!
Many people chose to use slicing software that is free, these programs work well, but other chose to use Simplify3D, which is more tunable. This guide will show settings used for the Rostock Max v3, and may work for other printers in the lineup.
Remember: Your Mileage May Vary
Disclaimer: SeeMeCNC does not provide technical support for third party software such as Simplify 3D
-
-
First step is to make sure that the ADVANCED SETTINGS are shown.
-
-
-
The next few images will show the settings that are used for PLA that have fixed issues for many people. Copy each of the values to your printer's profile.
-
The Extruder tab assumes that your printer has the stock .5mm nozzle installed.
-
Pay special attention to the Retraction Vertical Lift section.
-
-
-
On the Layer tab, pay attention to the settings for the first layer. The amount of top, bottom layers, along with the perimeters may vary depending on the print, as well as the layer height.
-
-
-
Under the Additions tab, the only settings to change are to the Skirt/Brim list. Printing with a raft on these machines seems counterproductive, and a waste of material. Since there is no purge line prior to the start of the print, set the number of skirt outlines to a minimum of 6. This gives the nozzle enough time to be primed and ready to go.
-
-
-
The Infill tab is next. The % of infill used for your print will vary from print to print, but the other options below it are important.
-
-
-
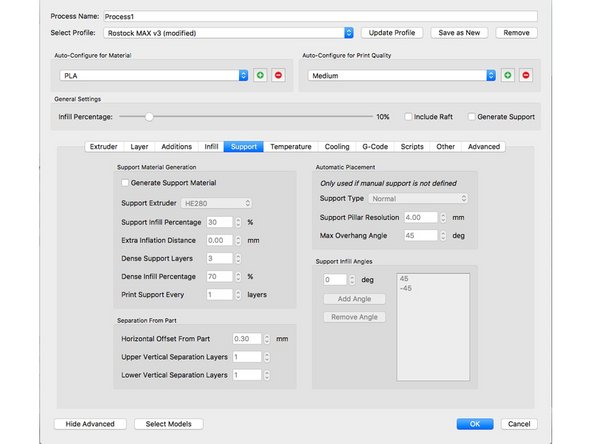
Support!!!! This section is very important when using support for your print where applicable. In this screenshot the support is turned off, but copying each setting value shown will ensure a great support structure, that produces great overhang/bridging layers. Pay close attention to the Support Infill Angles section.
-
-
-
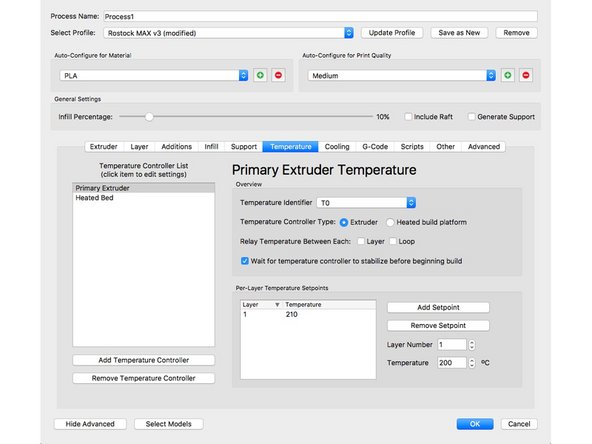
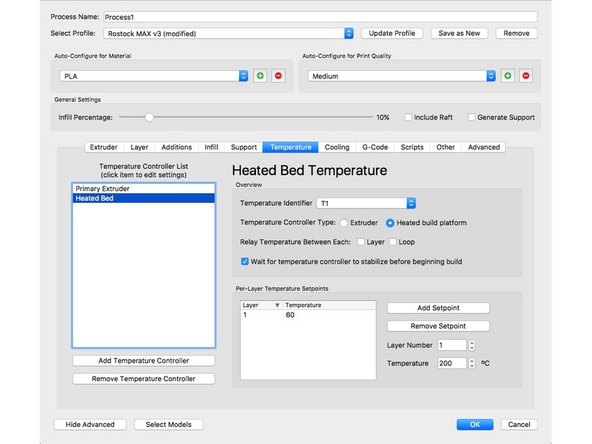
Located under the Temperature tab, you will find settings for the extruder, and heated bed.
-
Different types of PLA run different temps. Try starting at 210c, and work your way up or down from there depending on your material.
-
Setting the heated bed to 60c will yield great adhesion results when coupled with an aerosol hairspray of your choice.
-
-
-
The cooling settings for PLA are important. This printer comes with an amazing part fan setup that is tried and true. There is NO need to print ducts to redirect the air flow, or relocate the fans, or even change them out. The are designed to create a flow of air that hits perfectly every time.
-
So if you have modified your cooling... CHANGE IT BACK TO STOCK!
-
The 3 stage cooling setup shown works for almost every print.
-
-
-
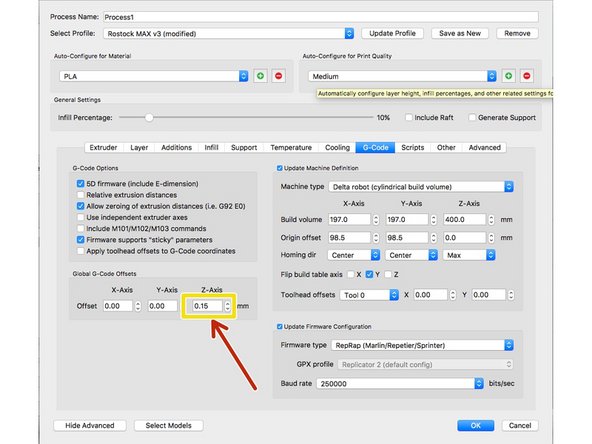
The tab labeled GCode should really have a different title, but follow these settings for the v3.
-
The Z-Axis Offset will vary for everyone. If after running a full calibration on the printer before your first print with these settings you find that the nozzle is a bit too close to the bed, start low and work your way up .01mm at a time in the called out section.
-
-
-
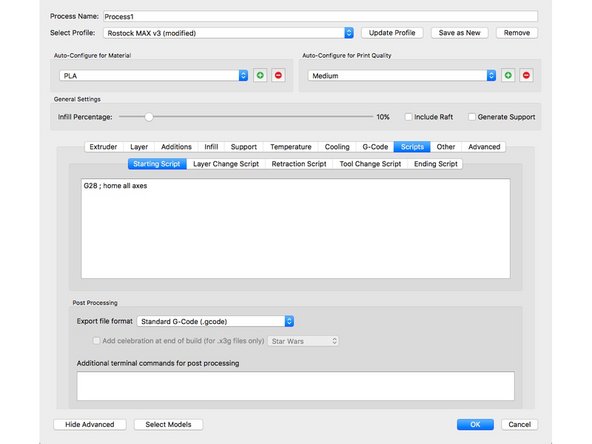
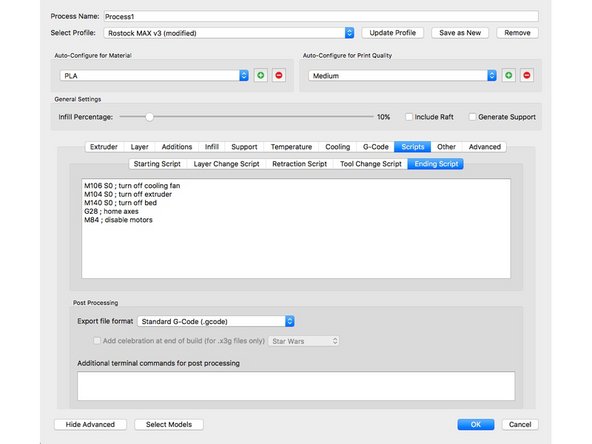
Under the Scripts tab, make sure that the following lines of code are present for the starting and ending script tabs shown.
-
-
-
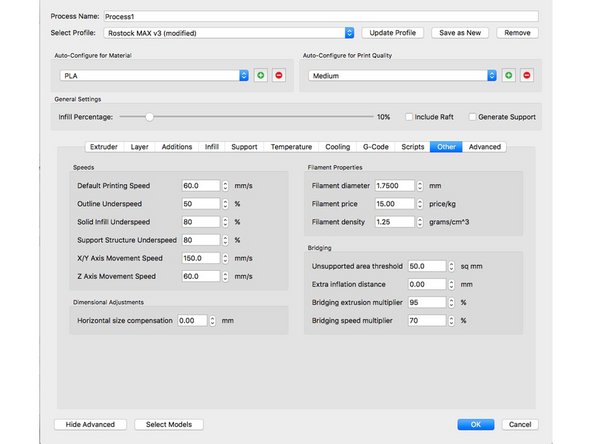
When navigating through the Other tab, print speeds may vary for some prints, but 60mm/s works very well. Sometimes when more detail is needed, 40mm/s works great.
-
Make sure in your general options for the program your Speed Display Units are set to mm/s and not mm/min. As 60mm/min is really, really slow. These settings can be found in the preferences for S3D
-
Then just copy all the rest of the values. The $$$ and weight of the filament affects 0% of the printing.
-
-
-
That's all for this guide. Give these settings a shot and see how they work for you. We'd love to hear your feedback.
-
Cancel: I did not complete this guide.
7 other people completed this guide.
4 Comments
Honestly thank you so much for your page. I’ve perused all kinds of topics on your channel, and I always thoroughly enjoy all of your content. Donkey kong
tracyberge - Resolved on Release Reply
Thumbs up guys you’re doing a really good job I appreciate what you have shared with us may GOD bless you always.
Rainbow Hosiery - Resolved on Release Reply
We read your blog and it is very beautiful and the content is also good. You have described the fabric and I liked it so thank you. You can use many items to decorate your bedroom like one of them is a bead skirt which enhances the beauty of your bed. And the work of hiding the low stuff kept in the base room is there and it also keeps the stuff kept under your bed away from the eyes of the people. And let us tell you that there are many types of 18 inch bed skirts and you can buy them according to your need.
donald robin - Resolved on Release Reply


