Introduction
The RAMBo control board was used between 2012 and 2017. The SeeMeCNC delta models include RostockMAX v1, RostockMAX v2, RostockMAX v3. The mini RAMBo (same firmware) was used on the Orion, H2, and Eris 3D delta printers.
-
-
Download the Arduino IDE.
-
PLEASE DOWNLOAD AND USE VERSION 1.6.0 AS THIS IS TESTED AND KNOWN TO WORK. (Links for download are below, select your OS)
-
Arduino Old Releases > download release 1.6.0
-
Run the installer.
-
-
-
In order to give the Arduino IDE something to do, we'll need to get the firmware downloaded! Click on the green "Clone or Download" button to activate the "Download ZIP" option as indicated by the arrow.
-
Firmware Download Link Click the green "CODE" and download the zip file.
-
Unpack the Zip file into a directory of your choice!
-
Edit the top section configuration.h file to match your SeeMeCNC printer setup.
-
-
-
Download the Rambo driver from the SeeMeCNC website. The driver can be found here.
-
Linux and Mac OS X does not require a driver so skip this step.
-
-
-
Plug in the power cord for the SeeMeCNC 3D Printer and turn the power on.
-
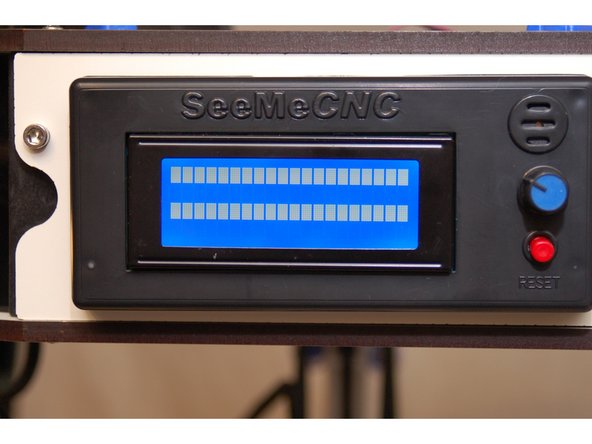
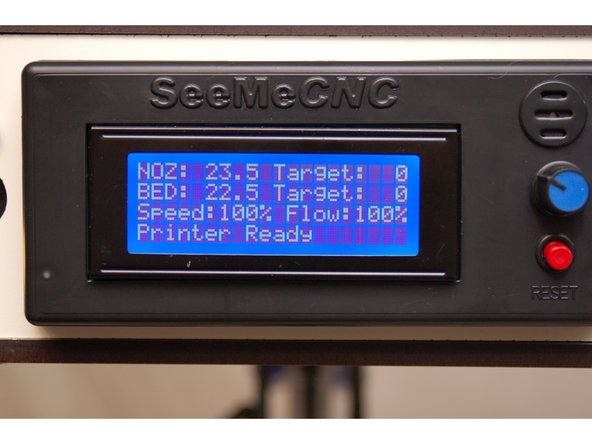
When powered up on a newly built printer, the display is going to appear as you see in the photograph. If you don't see a lit LCD with two lines of blocks, check your wiring to make sure everything is connected and correct!
-
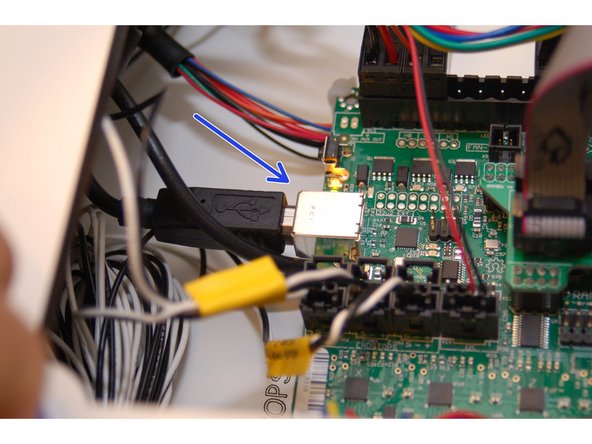
Next, connect the Rambo controller to your computer using the supplied USB cable. If you've got a Mac or Linux computer, there's no driver to install and you can move to the next step.
-
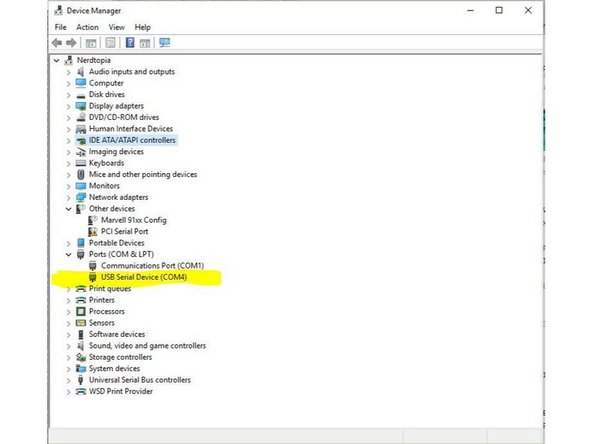
If you're using Windows, the driver supplied by the Arduino IDE may be the correct one for the Rambo. To check, open up your Device Manager and see if the Rambo appears as a standard USB Serial Device.
-
-
-
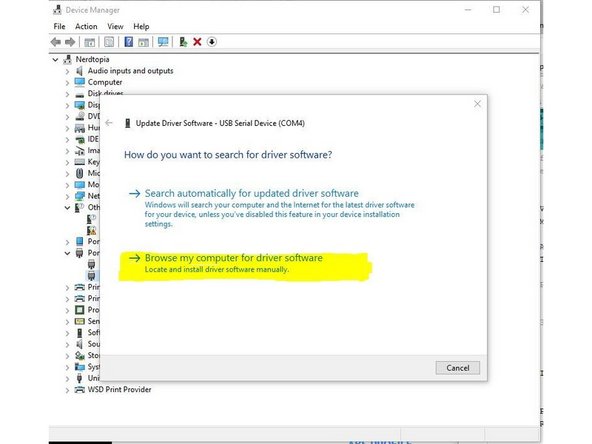
If the Rambo isn't properly detected, you can select it in the Device Manager window, right-click on it and click "Update Driver"
-
Click on the "Browse my computer for driver software." link and then navigate to where you unpacked the Rambo driver. Select it and continue.
-
This should have properly installed the driver if it was needed.
-
-
-
Start the Arduino IDE
-
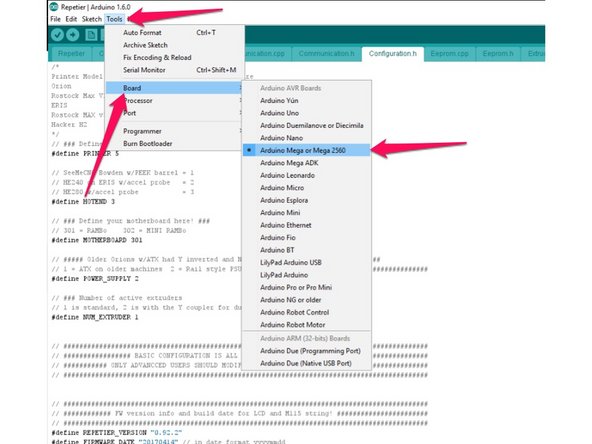
Select the "Tools" menu and scroll down to the "Boards" item. Select the entry marked "Arduino/Genuino Mega or Mega 2560".
-
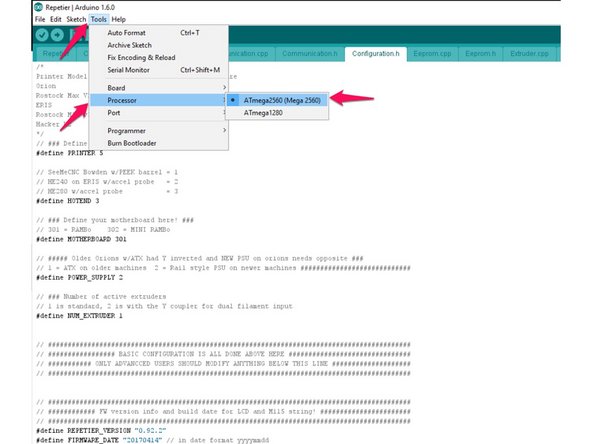
Next, select the "Tools" menu and scroll down to the "Processor" item. Select the entry marked ATmega2560 (Mega 2560)".
-
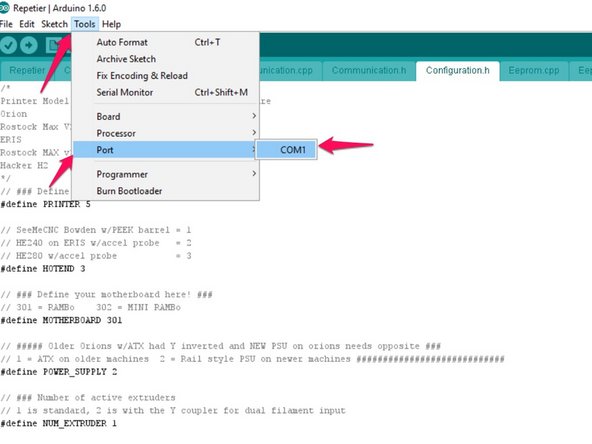
Next, click on the "Tools" item again, and pick "Port". Select the COM port that the Rambo appears as. (This is shown under the Ports node in your Device Manager!)
-
-
-
This step serves two purposes - first, it ensures that both the Arduino IDE configuration and Rambo are working. Second, it ensures that the EEPROM in the Rambo is cleared and ready to store your settings!
-
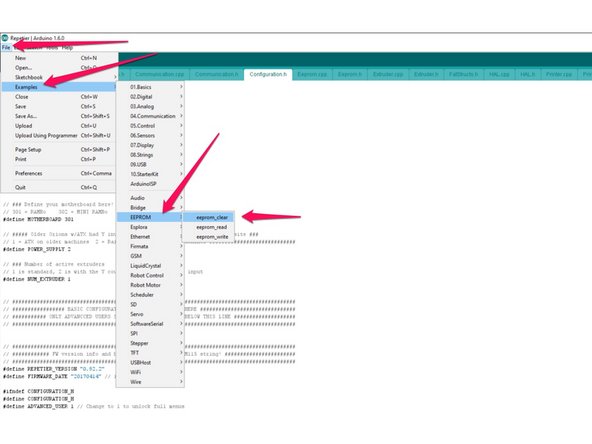
Click on the "File"menu and then scroll down to "Examples". Click on the "EEPROM" entry and then select "eeprom_clear". This will load the eeprom_clear program into the Arduino IDE.
-
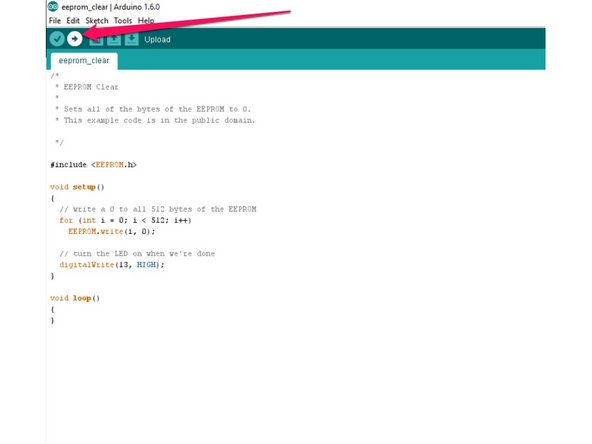
Click on the "Play" button as indicated by the arrow in the third image. This will compile the program and upload it to the Rambo. If all goes well, you'll see "Done uploading" in the bottom status bar of the Arduino IDE.
-
The eeprom_clear program shows no outward sign that it's working, so don't worry about any lack of feedback.
-
-
-
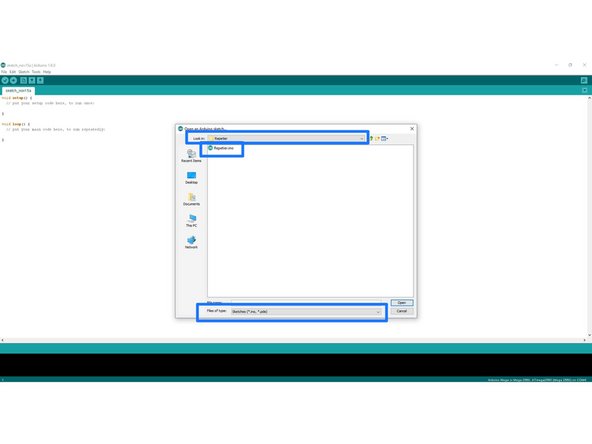
Start the Arduino IDE if you haven't already and then click on "File" and then "Open". Change "Files of Type" to "Sketches (*.ino, *.pde)" Browse to the location where you unpacked the firmware. You may have to go in one or two more sub-directories to reach the folder named "Repetier". This is where the firmware source code is.
-
Click on the "Repetier" file that has the Arduino IDE logo associated with it. This will load all the firmware files into the IDE.
-
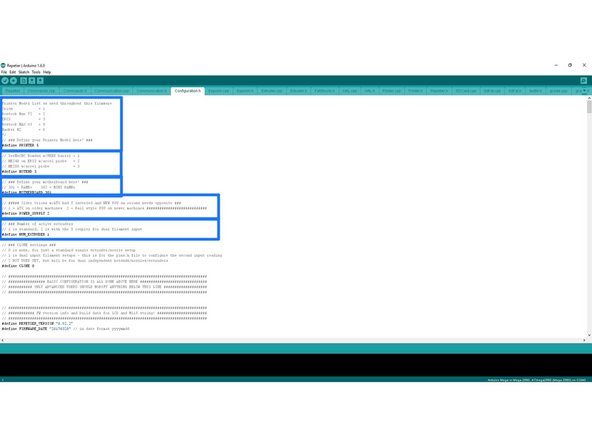
Click on the tab marked "Configuration.h". Locate the line "#define PRINTER". Change the value to match your printer model (default is 5 = Rostock Max v3)
-
Locate the line "#define HOTEND". Change the value to match your hot end. (Default is 3 = HE280)
-
Locate the line "#define MOTHERBOARD". This tells the firmware what kind of hardware you have. The Rostock Max v1, v2, and v3 use the RAMBo (301). Eris and Orions after 8/1/2016 use the Mini-RAMBo (302)
-
Locate the line "#define Power_Supply". by default it is set to 2 (Brick or Rail Style PSU). On older models of Rostock Max v2 and Orions equiped with an ATX supply you will need to change this variable to 1
-
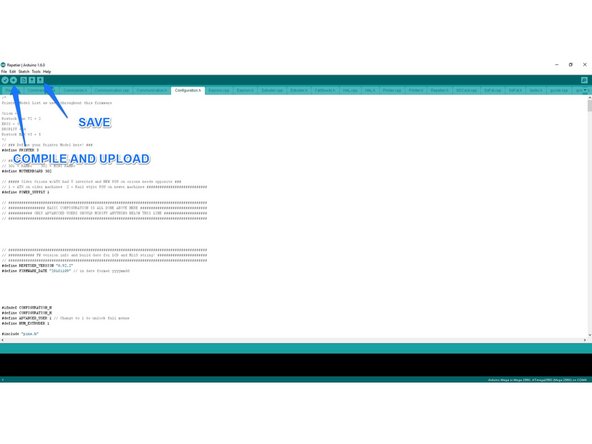
Just like you did for the eeprom_clear program, click the "Play" button in order to compile and upload the new firmware to the Rambo. You should see "Done Uploading" in the status bar when it's finished.
-
-
-
When the upload is completed, your display should change to show something similar to the image on the right.
-
If either NOZ or BED show "def", that indicates a problem with one or both of the thermistors. Check the wiring to make sure it's accurate and connected!
-
Congratulations! Your SeeMeCNC printer is ready to calibrate!
-
For calibrating your printer, please follow this guide: Calibration
-
-
-
Firmware is now installed on your printer. There is one final step standing between you and printing, and that is calibration. Don't worry though, with the HE280 Hotend calibration is a breeze.
-
Proceed to: Calibrating Your Printer
-
-
-
OctoPi is a lot of fun, however SeeMeCNC no longer provides technical support or troubleshooting. Proceed on your own and reach out to our forum for reference.
-
Click Here> You can download OctiPi from this location. If you don't have a SSH client, you can download one from this link.
-
The SSH client is required in order to do the initial setup of the operating system on your Raspberry Pi.
-
It's recommended that you follow the instructions titled "Getting Started with OctoPi"
-
The video linked on the "Getting Started" page does a good job of covering what you need to do in order to configure OctoPi.
-
Note that I've had some difficulty with the wifi if I encapsulate the SSID with double-quotes, eg. "my_ssid". If your SSID has spaces in it, and the Pi isn't appearing on your network, try using the single "'" quote instead of double quotes.
-
After running "raspi-config" to expand the file system, you'll want to run it again in order to set up your system for your current country and time zone.
-
-
-
To finish your OctoPi installation, you'll need to tell OctoPrint a bit about your printer.
-
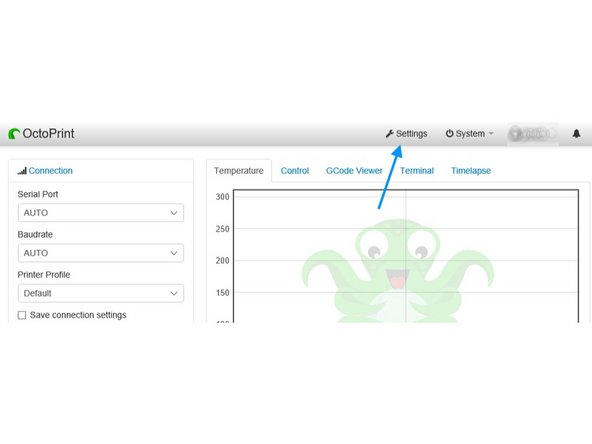
Click on the "Settings" button
-
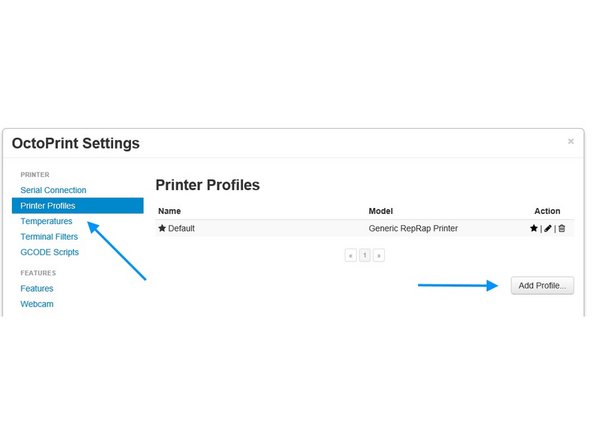
Click on "Printer Profiles" and then click the "Add Printer" button.
-
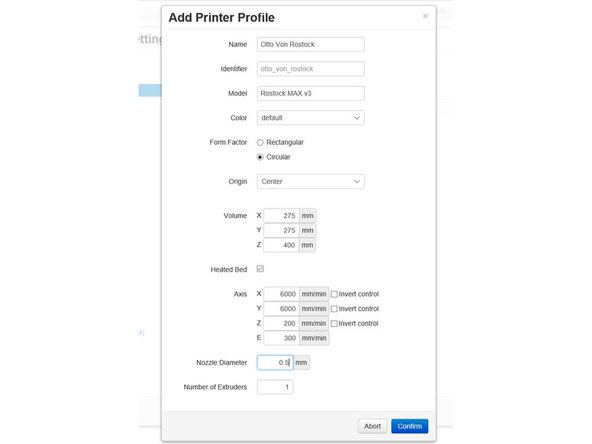
Name your printer however you'd like, but make sure you've got the "Volume" and "Nozzle Diameter" settings set as you see in the last image for this step.
-
-
-
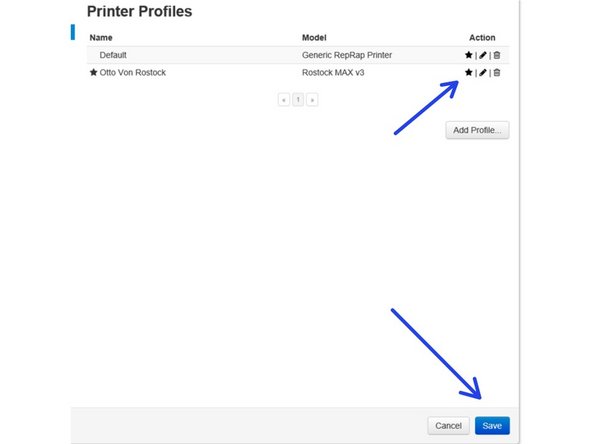
Once you've saved your new profile, make it the default profile by clicking on the star icon.
-
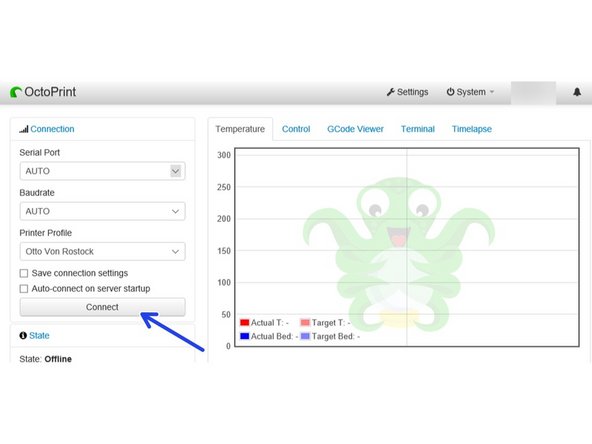
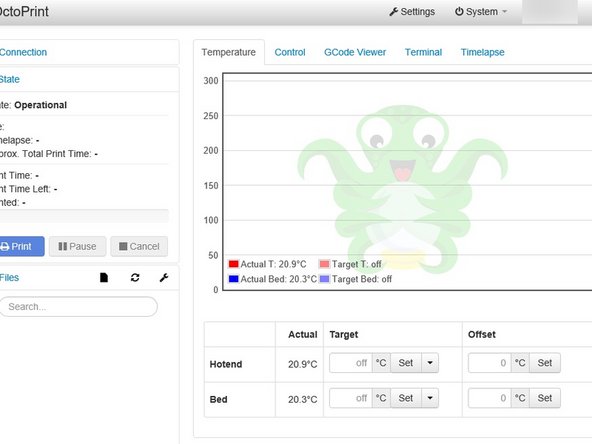
Finally, click on the "Connect" button to connect to your Rostock MAX v3.
-
Cancel: I did not complete this guide.
21 other people completed this guide.


