-
-
Items needed:
-
USB Webcam. Just about any should work. In this guide I am using a cheap cam I grabbed from a drawer.
-
Raspberry Pi with wireless. In this example I am using a Raspberry Pi 3.
-
Micro SD card. For this guide I am using a 16gb Class 10 SanDisk Ultra Micro SD card. *** I also use a Micro SD to standard SD card adapter to use my SD card reader on the computer.
-
-
-
There are a few things needed to get this going. First thing is the program I used to flash the SD card with the PI image. This software is balenaEtcher. Download it HERE
-
The Pi image I will be using is a an OS for Pi called motionEyeOS. The release github is located HERE
-
In this github, you will want to scroll down to the latest STABLE release, and not bother with pre-releases. Click the first Latest Release, you will download the image file for the hardware you are using. The file I am using was named motioneyeos-raspberrypi3-20190427.img.xz from the 20190427 folder as that was the latest release for me.
-
Not required, but suggested I use Notepad plus plus for editing text files. This is a fantastic program for all sorts of editing and has uses beyond just this guide. You can download Notepad++ HERE
-
-
-
Insert the micro SD card into your computer. I use a SD card reader and a Micro SD to standard SD card adapter.
-
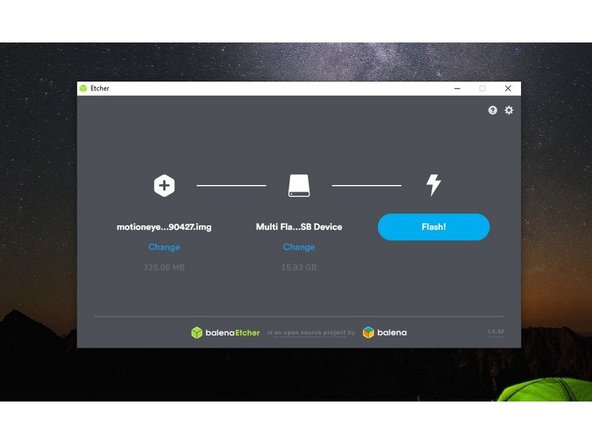
Install and run balenaEtcher. You should see the screen in Pic 1. The software should have auto-selected the SD card in the middle of the screen. If it is not your SD card, select change and choose your SD card.
-
Click Select Image. Select the motionEyeOS file you downloaded before. As stated my file was named motioneyeos-raspberrypi3-20190427.img.xz Your program should look like Pic 2. Click Flash!
-
There will be a orange progress bar showing Flashing. This will be followed by a box that says Validating. Once complete, you may get warnings about the SD card asking you to format. Ignore these and close the message as it is normal for a Pi image on the card.
-
-
-
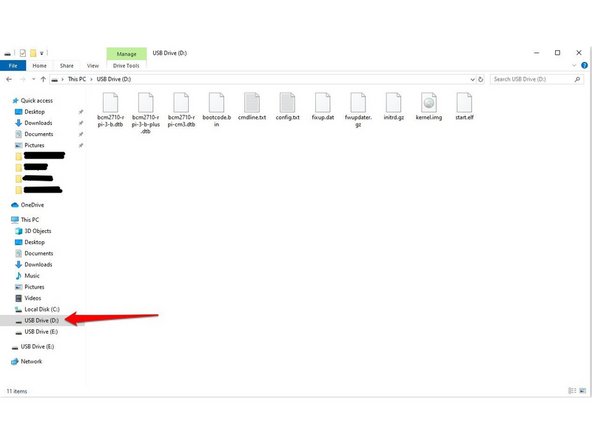
After the image is flashed, you may need to remove and re-insert the SD card for the computer to view it. The SD card will give multiple drive letters, and some drives will asked to be formated. Do Not format, just ignore the messages. Open the first drive for the SD card. In my case it was D:
-
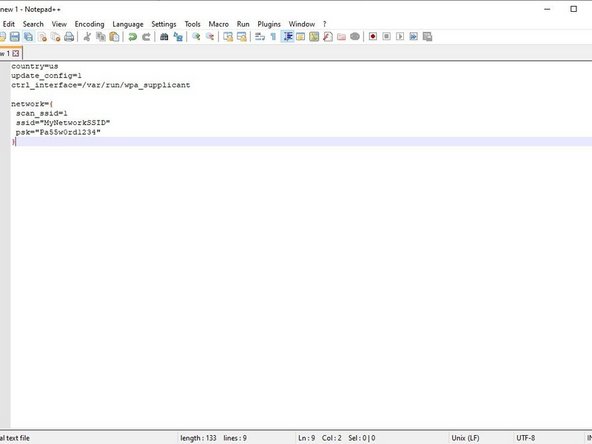
Install and open Notepad plus plus. Start a new document. Click Edit, go to EOL Conversion, and select Unix. In the new document you want to type the info shown in Pic 2.
-
Change MyNetworkSSID and Pa55w0rd1234 to your network ID and Password. They both must be in quotes, so do not remove the quotes!
-
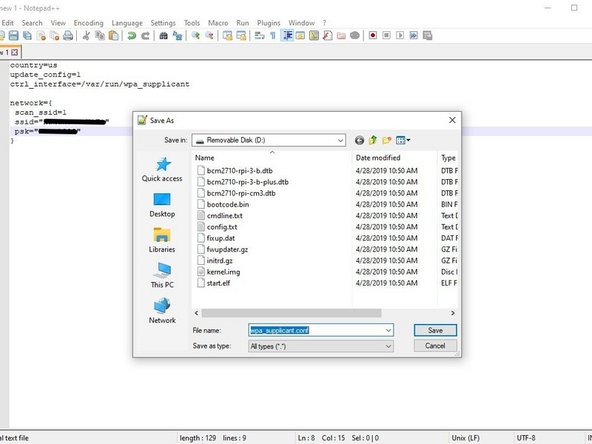
Click save. A box will pop up where to save it. Select the SD cards first drive (in my case D drive). At the bottom for file type, click it and scroll to the top and select All Files. Name the file wpa_supplicant.conf as shown in Pic 3 and click Save.
-
You can now eject the SD card, and insert it into your Raspberry Pi.
-
-
-
With the SD card now in the Pi and configured with your wifi information, Plug the Pi into a power source to turn it on.
-
Once powered on, it should automatically connect to your wifi, so now you need to find the IP address of the Pi and motionEyeOS.
-
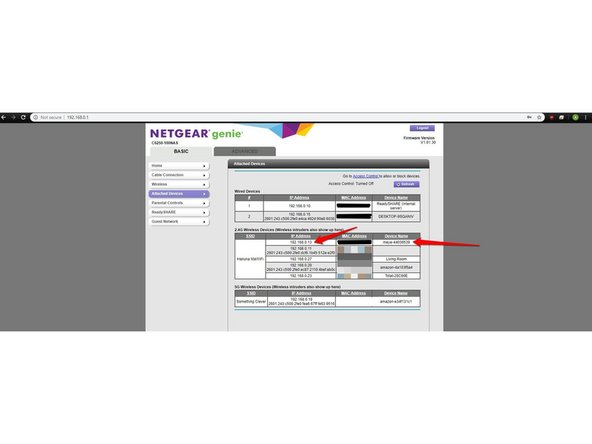
I logged into my router from my computer which is typically done by going to your routers IP. For my router it is bringing up 192.168.0.1 in a web browser. Then click on attached devices. Your router may vary verbage.
-
You can see in the first picture that the Pi is named meye for motionEyeOS. This gave my Pi an IP of 192.168.0.13 (yours will be different).
-
-
-
Now plug your webcam into the Pi and go to the IP address of your Pi in a web browser. This will bring you to a login page for motionEye. The default is set up for Username: Admin and no password so leave that blank.
-
You will see a message saying you have not configured your camera, so click that link to set up your camera. Your camera should be auto detected, so on the next popup the dropdown should show your web cam. Click OK to continue.
-
This should turn on the camera and you should get a picture from your camera. On this page you can configure everything for motionEye. If you wish to set a different user name and password to log into the camera, you can do so under general settings.
-
By toggling ON advanced settings under the general settings tab, you can change lots of settings and adjust the webcam settings to get your picture better. I suggest only changing one thing a little at a time and click the apply button so you can always go back if the changes are not to your liking.
-
-
-
We will now connect to the Duet Web Interface for the printer.
-
On the web interface, you will want to click on settings on the left, then User Interface as shown in Pic 1.
-
On the right will be the webcam information. You will put in the IP address of your webcam for mobileEyeOS (include the http for a full address as seen in the pic). Next check the box that says Embed Webcam Stream. Then click Apply Settings at the bottom of the page.
-
Once you get a green box that says Settings Applied, you can go to the Job Status section on the left and you should see the login page for mobileEyeOS. Log in and you will now have the webcam shown on this page.
-
-
-
You now have a webcam stream embedded into the web interface!
-
Now if you are in another room you can log into the web interface to view the print in progress and make sure everything is doing well.
-