
-
-
Close other applications that may use the USB com port.
-
This printer is NOT designed to run from the USB port. Only connect the USB cable during setup of the printer.
-
The printer is designed to run from either (a) browser window over your intranet or (b) by addition of touchscreen with SD card reader
-
Close Cura, Mattercontrol, or other slicers you may have open.
-
Close any non-3D related programs, like Arduino or other programs that may use the USB com port.
-
-
-
IF YOU BOUGHT AN RTP FULLY ASSEMBLED PRINTER, SKIP TO STEP 5. DO NOT install new firmware, your printer is ready to use.
-
-
-
If you are running windows, click here to download the Duet Wifi Drivers. If you are running Mac or Linux, you won't need them - skip this step. Unzip the file and save the drivers somewhere you'll be able to find them. On windows 10, just right click the "duet.inf" file and choose install. On windows 7, you'll need to find the duet in Device Manager and click update driver.
-
1. Right Click on the Duet.inf file and choose "install"
-
2. Allow windows to install the driver
-
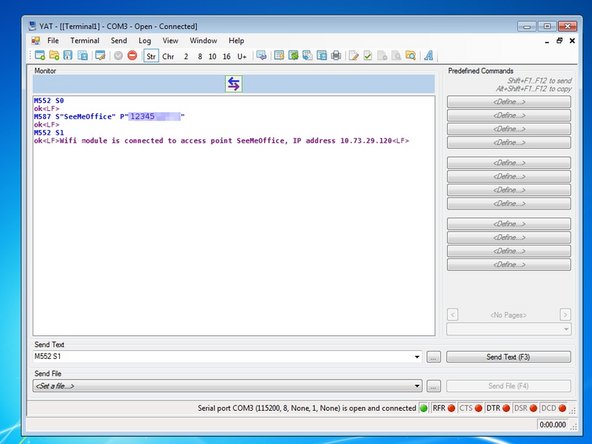
If you don't already have a program installed to send commands to a 3D printer, we recommend YAT (Download here: click here to open sourceforge). Once it's downloaded you shouldn't need to change any settings, just connect to the printer.
-
If you are using Simplify 3D, Pronterface, or MatterControl to connect to the printer, make sure it's not converting all your text to uppercase when you're setting up your wifi in the next step.
-
-
-
If you purchased an RTP (ready to print) please skip this step.
-
CLICK HERE > Follow this guide to download and install the latest firmware
-
-
-
If you are not using a MAC, proceed to the next step.
-
Mac OSX Users: Open Applications > Utilities > Terminal .
-
Run ls /dev/tty.*
-
Copy the result that has USB in the name. For example; /dev/tty.usbmodem1411
-
Run screen /dev/tty.usbmodem1411 115200. Replace "usbmodem1411" with the result you received. You should see a blank screen. Hit enter and you should see OK returned. You are connected successfully.
-
If you get an error, Sorry, could not find a PTY. unplug the USB, plug it back in and try again.
-
-
-
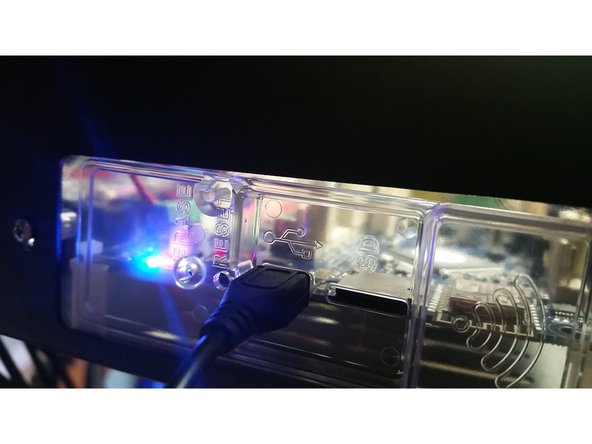
Plug the micro USB cable into the USB slot on the (top) middle of your printer.
-
Connect to the printer with YAT, S3D, MatterControl, or carrier pidgeon. Note that you'll need to set the baud rate to 115200 in order to connect. Carrier pigeon baud rates vary by vendor.
-
Send the following Gcode to the printer: M552 S0 Then send: M587 S"your-network-ssid" P"your-network-password"
-
Send: M552 S1 and after a few seconds, you should see a confirmation that you're connected, along with the IP address of your printer. Write the IP address down, you'll use it in the next steps
-
Make sure your printer is close to your Wifi Router. If you a getting a lot of AJAX disconnected errors, it's probably because the printer can't talk to your wifi reliably. Keep the distance between them to a minimum.
-
The SD card can become partially unseated in shipping. It is highly recommended to remove it (push it in until you hear the click, then it'll come out) and put it back in (push until you hear the click) before you get too far into the setup.
-
-
-
If you purchased a fully assembled RTP (ready to print) machine, please skip this step.
-
I you purchased a RostockMAX v3.2 full kit, disregard this step and continue to the next step. Your v3.2 kit is equipped with 0.9 degree stepper motors and 16 tooth timing pulleys.
-
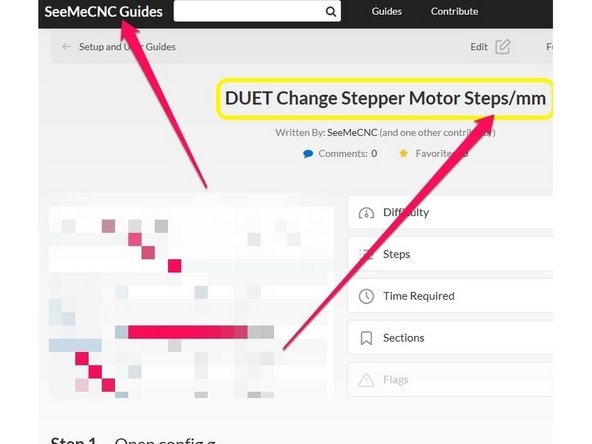
If you purchased v3 to v3.2 conversion upgrade, then follow this step for modifying the stepper motor steps/mm.
-
Click Here and follow this guide: How to update stepper motor steps/mm
-
-
-
If you purchased a fully assembled RTP (ready to print) machine, please skip this step.
-
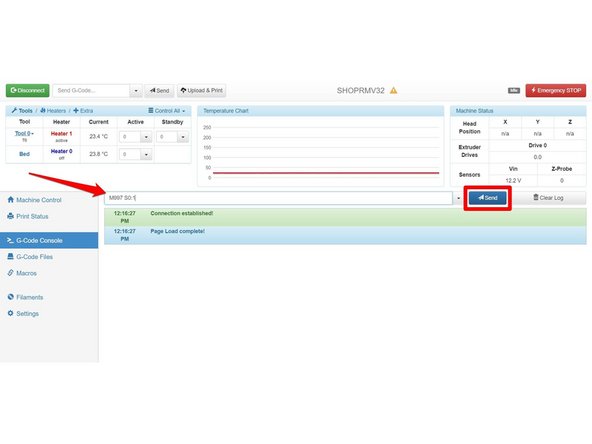
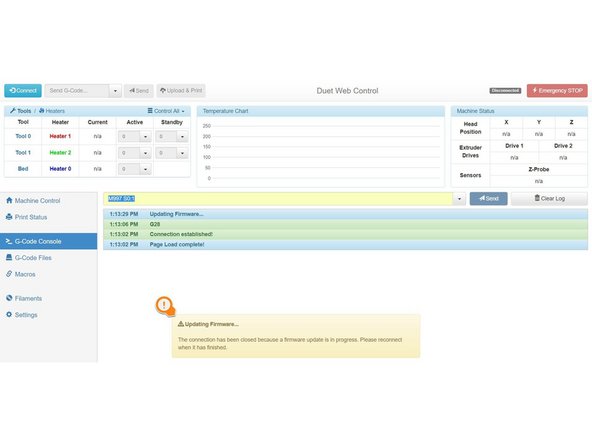
Go to the "G-Code Console" page.
-
In the text field, type in M997 S0:1 . This command manually triggers a firmware update to the latest version.
-
If done successfully, you should see an attention box telling you the connection has been terminated while updating the firmware.
-
Wait a minute or so, then reconnect to the printer using the blue "Connect" button at the top left of the window.
-
-
-
If you purchased a fully assembled RTP (ready to print) machine, please skip this step.
-
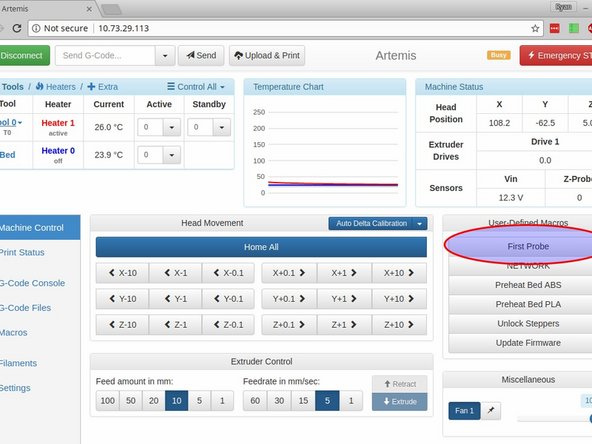
We have setup a custom macro to take care of all the heavy lifting for your first calibration. On the "Machine Control" tab, you can click "First Probe" under "User-Defined Macros" to do your first calibration.
-
The first probe macro will do a 10 point calibration (single tapping), then do a large bed map (double tapping), then a final 10 point calibration (double tapping). It will take about 5 minutes to run all the way through. Don't worry, future calibrations go much faster.
-
The first probe macro will automatically pre-heat the bed.
-
Test your calibration by putting a sheet of paper on the bed and running: "G0 Z0" in the gcode console. Your nozzle should just touch and pinch the paper so it's hard to move. If it's too loose, run the following GCode: "G31 P100 X0 Y0 Z-0.1", then run "G32" to recalibrate, then "M500" To save all your current calibrations and settings.
-
If it's too tight, you want to try "G31 P100 X0 Y0 Z-0.3", then run "G32". If it's still too tight, make the number after Z a larger negative number. If it's still too loose, make it a smaller negative number.
-
After your initial calibration, you can calibrate by clicking the "Auto Delta Calibration" button, or by sending "G32" in the gcode console.
-
You might see a line or two that says the Height Error Difference was above the maximum tolerance. Don't worry about them - if there's a real problem it will abort the calibration.
-
-
-
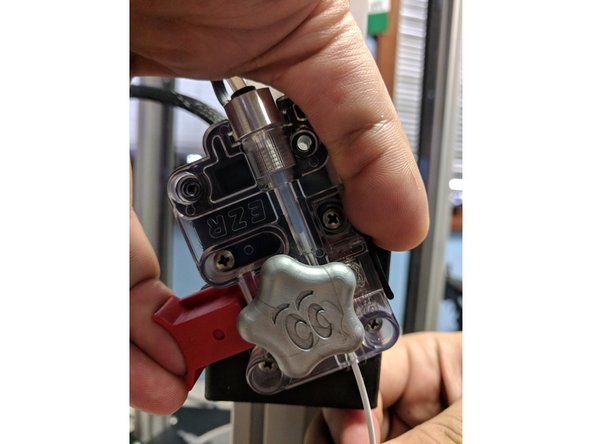
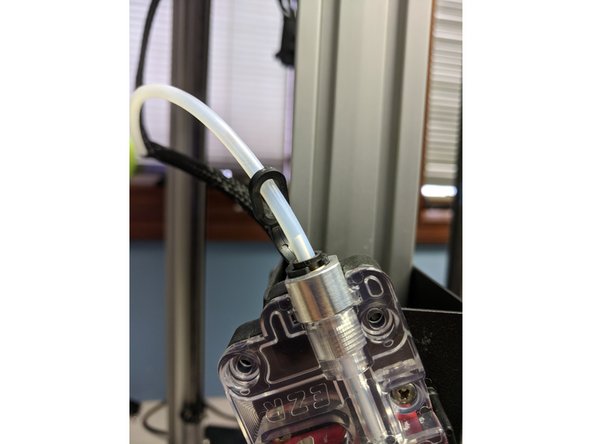
You can load filament by heating the hot end up to 220 degrees and manually feeding the filament in through the EZR and boden tube, or by using the "Filament Load" macro
-
To use the load filament macro, hold in the red button on the EZR extruder and press the filament in until it is just peeking out the side with the boden tube. Then click "Filament Load" under User-Defined Macros, and click OK.
-
Click here Click here for the guide on creating macros
-
-
Picture is for reference only - the EZR will be orientated differently on the V3.2
-
-
-
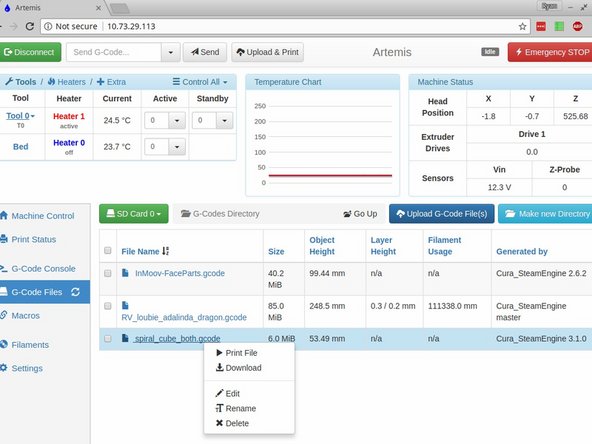
The printer is designed to run from either (a) browser window over your intranet or (b) by using the optional touchscreen controller with SD card reader
-
Upload and print your first gcode file. You can do this two different ways. You can either click "Upload & Print" at the top of the page, or click on G-Code files at the side of the page, then "Upload G-Code File(s)", then select your file from the list.
-
A pre-sliced file for your first print should already be loaded on your SD card. This test print is called "firstprint.gcode"
-
-
-
We recommend using Cura for slicing. All v3.2 testing is performed with Cura and our slicing profiles for our printers will get you going fast! Click here to see our guide for installing Cura and downloading our profiles for your new printer.
-


Cancel: I did not complete this guide.
One other person completed this guide.