Difficulty
Moderate
Steps
9
Time Required

User-Contributed Guide
This guide is not managed by the site's staff.
Quiz
0
-
-
We have created video Instructions of for this process which can be viewed here: https://youtu.be/OGmBq92lVpc
-
You can Download the firmware here: https://github.com/seemecnc/Firmware
-
Extract the files from the zipped folder.
-
If you are new to extracting files, you will need to go to the folder where the firmware was downloaded to (most commonly your downloads folder)
-
Right Click on the folder named: Firmware Master, and from the options available choose EXTRACT ALL.
-
Choose Extract in the dialogue box that pops up.
-
You can now copy and past the extracted folder of firmware files to your preferred location ie. Desktop, My Documents etc.
-
-
-
In order to compile and upload the firmware to the RAMBo controller, you're going to need the Arduino IDE. This is an open source software development environment targeted at the Arduino family of ATMega-based micro-controller project boards. At its heart, the RAMBo controller is just an Arduino Mega 2560 with a lot of goodies attached to it.
-
You can download the Windows, MacOS and Linux version of the Arduino IDE from here: https://www.arduino.cc/en/Main/OldSoftwa... Choose the appropriate Platform. As of the time of this writing, we are using Arduino 1.6.4 There are many versions available of Arduino, but all are compatible.
-
Start the Arduino IDE – you should be presented with a screen that looks similar to the first image on the left:
-
-
-
If you are using a Windows machine you must first install a driver before you can communicate with the Mini RAMBo via your computer. users of other operating systems can skip to the next step.
-
We have created video Instructions of for this process which can be viewed here: https://youtu.be/B8CV9DC_6hk
-
Download the USB Driver: http://download.seemecnc.com/RAMBOUSBDRI...
-
Extract the files (we previously discussed how to extract files)
-
Plug in the Mini RAMBo with the supllied USB and let Windows “fail” to find the correct driver for the board.
-
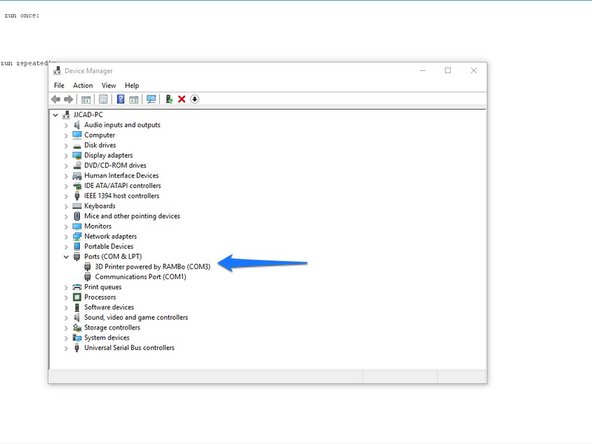
Open up the device manager by right-clicking on “Computer” or “My Computer” and select “Properties” followed by “Device Manager”. Scroll down to the “Unknown Devices” entry and right-click on the RAMBo entry. Choose “Update Driver” and then “Browse my computer for driver software” (or something similar to this).
-
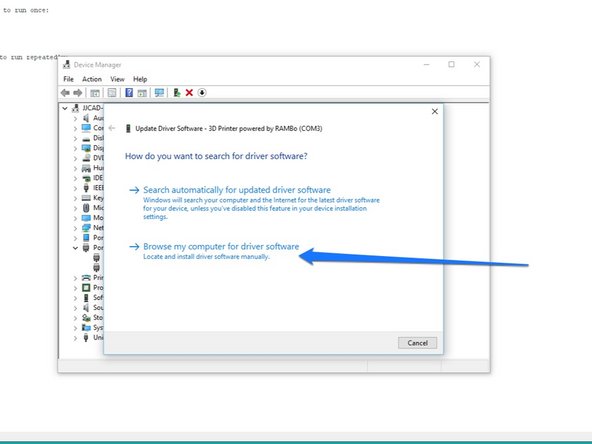
Choose “Let me pick from a list of device drivers on my computer”, then click the button for “Have Disk”. Browse to where you unzipped the file you downloaded and then click “OK”. It may complain (depending on OS) that the driver isn’t signed – allow it to install it anyway. The RAMBo will now appear on your computer as a standard serial port.
-
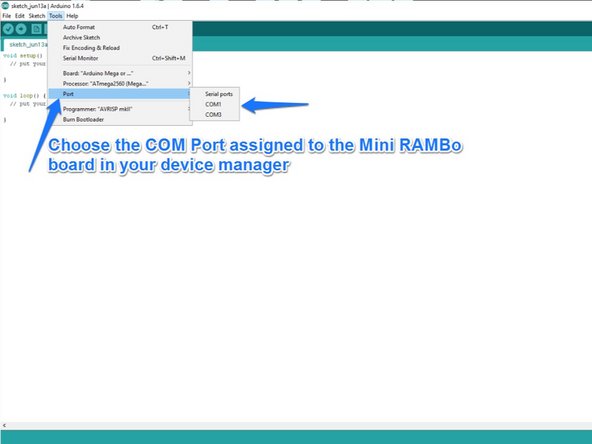
Note the COM PORT that is assigned for use later in the setup.
-
-
-
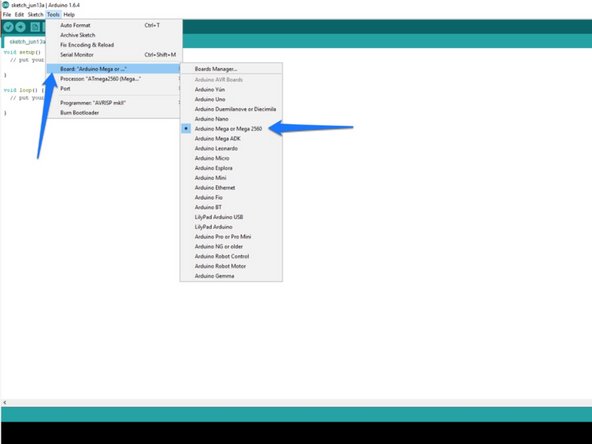
Before we can use the IDE to upload the firmware to the Mini RAMBo controller, we need to tell the Arduino IDE what kind of board we have and what communications port it needs to use in order to perform the upload task.
-
Click on the “Tools” menu item and then click on “Board” and then “Arduino Mega or Mega 2560”.
-
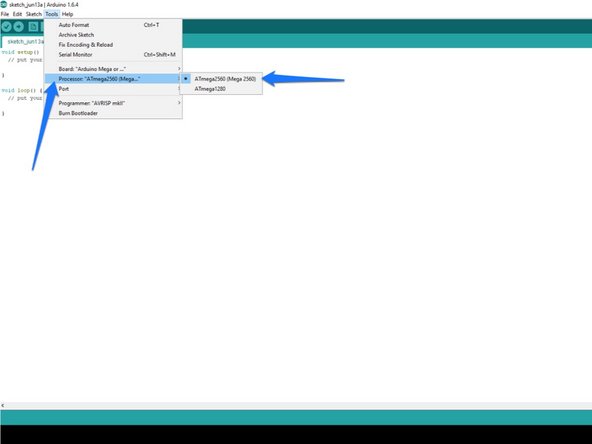
Click on the “Tools” menu item and then click on “Processor” and then “AT Mega (Mega 2560)”.
-
Next, you'll need to tell the Arduino IDE what port to talk to the RAMBo on. To do this, click on “Tools”, “Serial Port” and then choose the COM port that your RAMBo appears as on your computer. (you can find this in the device manager)
-
-
-
We have created video Instructions of for this process which can be viewed here: https://youtu.be/CK5jdoCyp1g
-
To test the upload we are going to clear the EEPROM from the Mini RAMBo board.
-
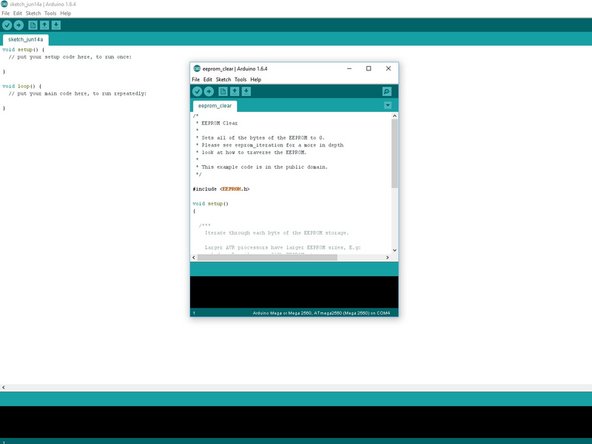
As directed int he video, within Arduino go to File > Examples > EEPROM > EEPROM Clear
-
This will open a new instance of Ardunio with the EEPROM Clear Sketch.
-
Click the Upload button (rightward pointing arrow)
-
Once the sketch has been uploaded you will see DONE UPLOADING in the bottom of the Arduino IDE
-
-
-
We have created video Instructions of for this process which can be viewed here: https://youtu.be/_uoq0kK2gWk
-
In Arduino choose FILE > OPEN, then navigate to the firmware you downloaded : Firmware -master > Firmware -master > Repetier Firmware > Repetier > Repetier (this file has the Arduino Icon next to it) Select the file and choose open.
-
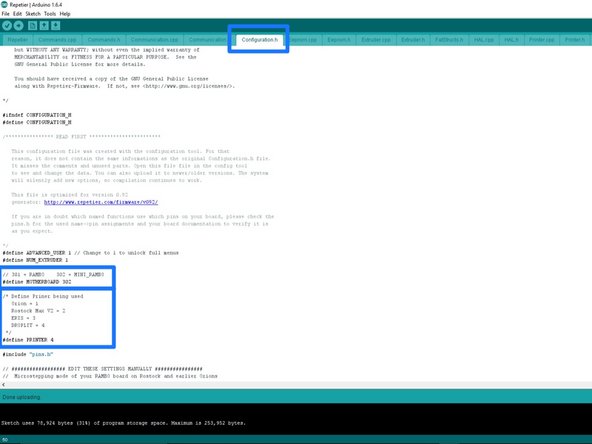
With the firmware open in Arduino, click on the configuration.h tab near the top center of the screen.
-
Verify that line 42 matches this: #define MOTHERBOARD 302
-
Change line 50 to match this: #define PRINTER 4
-
Save the changes & Click the compile button (check mark in the upper left corner of Arduino)
-
Click the upload button (right facing arrow in the upper left corner of Arduino)
-
The firmware has now been uploaded to the Mini RAMBo board.
-
-
-
Download NanoDLP: http://www.nanodlp.com/nanodlp.zip
-
Extract the files after the download has completed.
-
-
-
Based on your computer's operating system follow one of these guides for:
-
-
-
-
NOTE: To copy NanoDLP SD image file, you need a computer with card reader.
-
-
-
Put microSD card into Raspberry Pi and turn the power to the Droplit v2 on
-
Connect an ethernet cable to the Raspberry Pi and your Router (this is a one time setup requirement until the wifi has been connected)
-
To find out your Raspberry Pi's IP address open your computer's network area. Or visit the online dashboard http://www.nanodlp.com/dashboard to see online nanoDLP printers in your network
-